Description
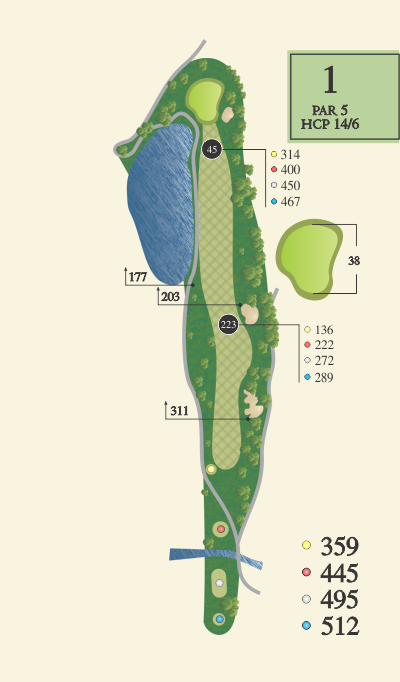
This picturesque opening hole is a reachable par 5 for longer hitters. The landing zone for the tee shot is guarded by trees on the left and trees and a bunker on the right (the first bunker on the right in the yardage book has been removed). Depending on the yardage to the green and the players ability, the second shot can be a layup to a comfortable yardage or taking the risk and going for the green. A layup shot must avoid the lake on the left and trees on the right, both are very penal. The large green is protected by the lake on the left and a bunker on the right. The green is very deep so missing a bit long is better than coming up short.
| Yellow | 359 |
| Red | 445 |
| White | 495 |
| Blue | 512 |

Description
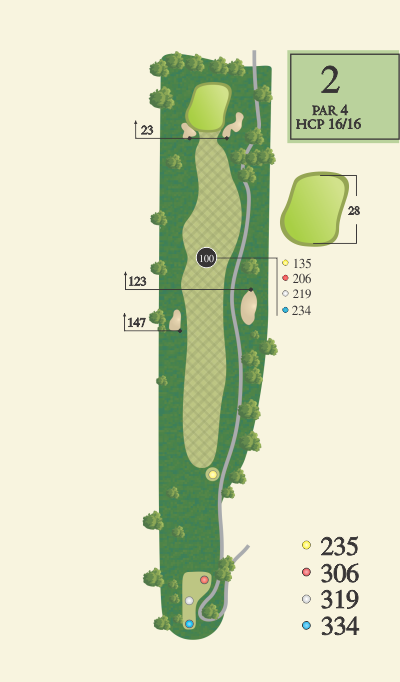
Although this hole provides a good birdie opportunity, there is really no need to hit driver on this short par 4. Accuracy off the tee is key. Fairway bunkers guard the landing zone on both the right and left, although they are around 200 yards from the tees. For long hitters trying to get close to the green, beware that a shot fading right easily can hit the cart path and end up behind the grove of trees or out of bounds. The approach shot requires good distance control. There is a false front and a run-off area on the left back side of the green. Bunkers guard both the right and left front portion of the green. The green slopes slightly back to front.
| Yellow | 235 |
| Red | 306 |
| White | 319 |
| Blue | 334 |

Description
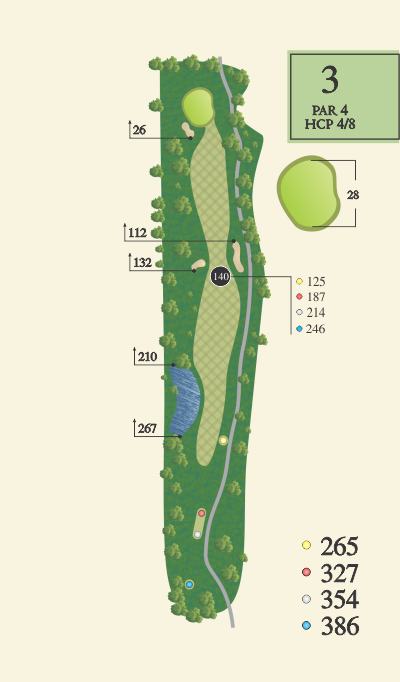
A critical decision off the tee here as trouble awaits right and left in the landing zone. Either lay-up short of the bunkers right and left leaving about 140 yards to the green; or, hit enough club to clear the bunkers and take on some additional risk leaving about 100-130 yards. Depending on the pin, a smart shot is the center of this green leaving a good look for birdie or par. Another false front to this green and a run off on the left side. There is a bunker guarding this green on the left.
| Yellow | 265 |
| Red | 327 |
| White | 354 |
| Blue | 386 |

Description
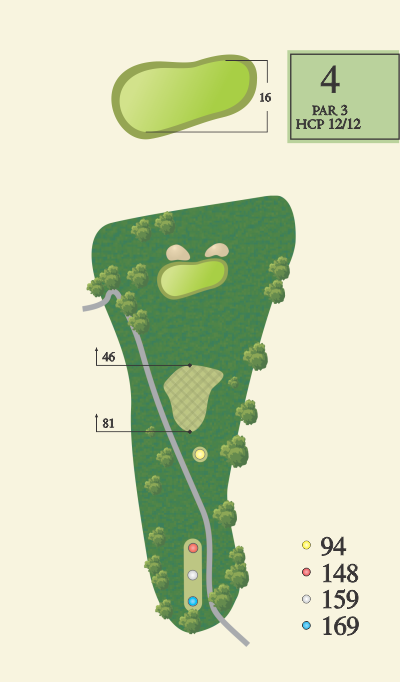
Locals refer to this challenging par 3 as the shortest par 4 on the course. There is a large valley in front of the green that leaves a delicate chip to the green. Balls hit slightly short will roll off the front into the valley. When in doubt on what to hit, take an extra club. This hole plays slightly uphill and wind effects its length as well. The green is wide and narrow making it a challenging green to hit in regulation. Any shot into the bunkers right and left behind the green bring double into play quickly. Overall the green slopes back to front and left to right, with a ridge dividing the left and right side of the green. Hit the right middle of the green and the ball will roll to the right.
| Yellow | 94 |
| Red | 148 |
| White | 159 |
| Blue | 169 |

Description
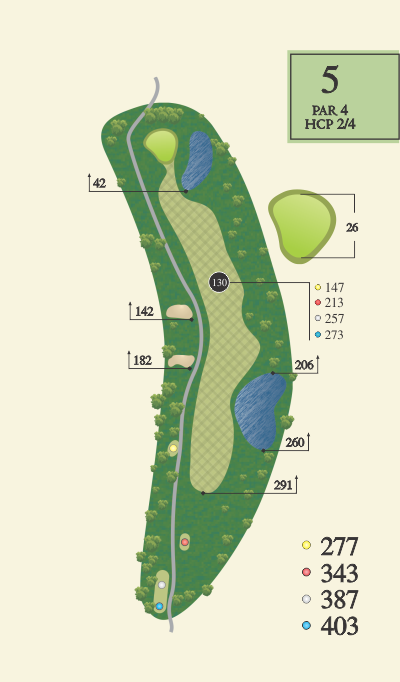
A challenging dogleg left par 4. An accurate drive over the cart path on the corner right of the two fairway bunkers and left of the lake will set you up nicely for your approach shot. Drives hit further right add significant distance and a more challenging angle into the green to your approach shot. A small lake protects the front right side of the green. The green is a two-tier green with the ridge running from front to back in the middle of the green with the higher and smaller portion on the right side of the green. Pay attention to the pin placement and be sure to be on the proper level.
| Yellow | 277 |
| Red | 343 |
| White | 387 |
| Blue | 403 |

Description
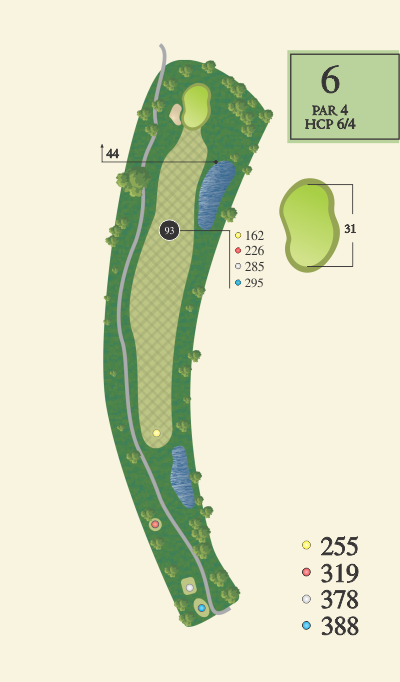
A gentle dogleg right. A large walnut tree on the left side provides a good target off the tee. Long hitters need to be wary of the lake on the right that is hidden from the back tee box. With a solid drive the approach shot becomes straightforward. The green is a deep two-tier green with the ridge running left to right in the middle of the green. Leaving your approach shot a little short on the front portion of the green is better than going long trying to stick it on a back-flag position.
| Yellow | 255 |
| Red | 319 |
| White | 378 |
| Blue | 388 |
Description
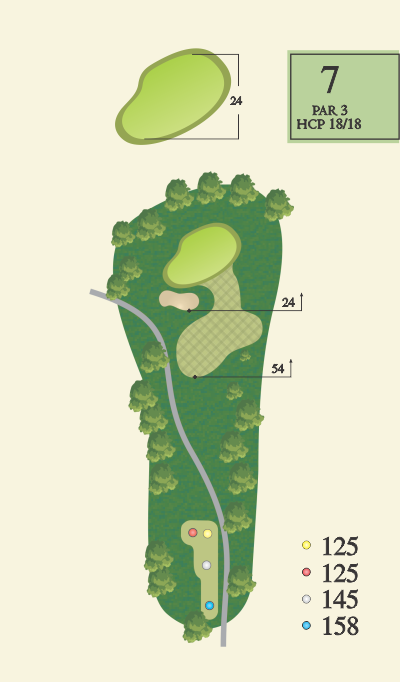
A fairly straight forward par 3. This hole plays slightly longer than the yardage indicates because it is a bit uphill and there is often wind that is difficult to feel from the tee box. A front pin placement requires plenty of club to avoid the large deep-faced bunker waiting to swallow up your golf ball short left. A shot to the middle of the green should allow a birdie putt or an easy par.
| Yellow | 125 |
| Red | 125 |
| White | 145 |
| Blue | 158 |

Description
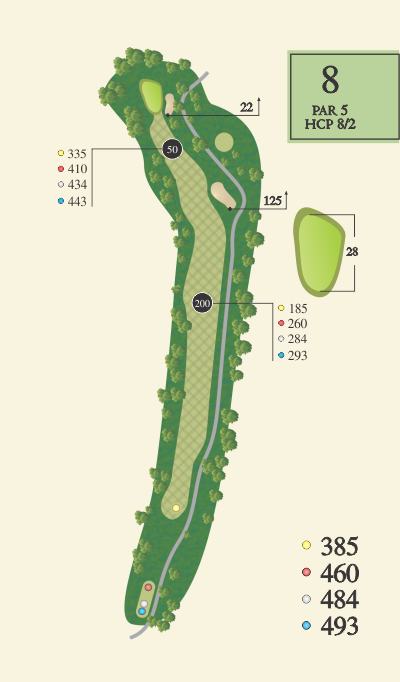
The drive off the tee is critical on this hole. The narrow landing zone combined with trees encroaching on the left create severe penalties for a poorly hit drive. Out of bounds on the right comes into play very quickly. The relatively short yardage makes it a tempting par 5 to go for the green in two shots, but that narrow fairway is matched with a narrow green making this a difficult up and down when missed. Trees and a green side bunker protect the right side of the green. A shot missed left creates a delicate chip shot to a green running away. A par here is always a good score.
| Yellow | 385 |
| Red | 460 |
| White | 484 |
| Blue | 493 |

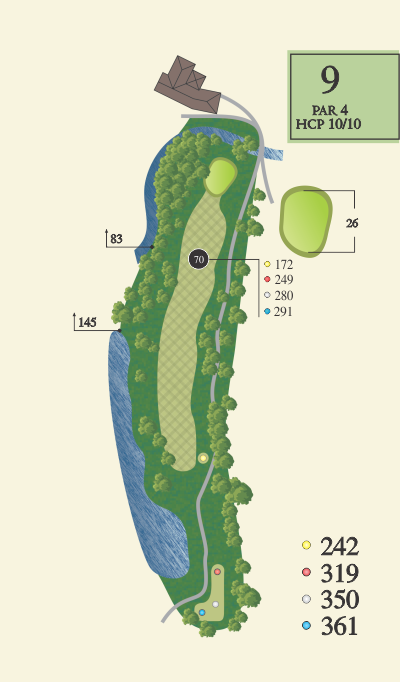
Description
A large lake on the left, and Claggett creek behind the green create a great finishing hole to our front nine. This is a challenging driving hole with several club options off the tee, choose wisely. Groves of trees on both the left and right make a drive in the fairway critical to success. Depending on the club selection off the tee, you should have a mid to short iron left to the green. The green has a steep approach and false front so a shot too short will roll back down the slope. Avoid going over the green as the creek lurks beyond, or at least a very difficult up and down.
| Yellow | 242 |
| Red | 319 |
| White | 350 |
| Blue | 361 |

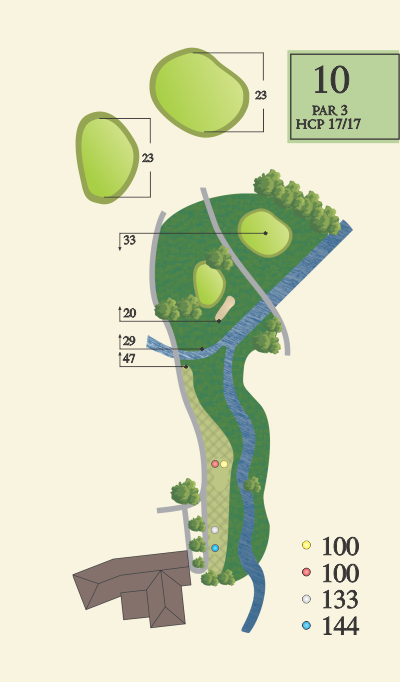
Description
This tough little par 3 offers two choices for greens. The shorter yardage green is just over Claggett Creek. It is guarded by a large tree on the front left of the green and a bunker on the right. Anything short will be in the creek. Hitting into the tree likely will knock the ball back into the creek. This green has varying slope making almost all putts challenging. The right green is 33 yards longer, but not as well guarded by hazards. Claggett Creek still runs in front of the green, but shots hitting the bank short of the green may not roll back into the creek. The green offers plenty of slope, but many find putting on it a bit easier.
| Yellow | 100 |
| Red | 100 |
| White | 133 |
| Blue | 144 |


Description
Our most difficult hole. This dogleg right par 4 has a large water hazard cutting across the entire fairway about 255 yards from the white tees. Big hitters can carry or roll into the lake on a good tee shot. A mishit tee shot may require a layup. The approach shot into the green requires strategic thought because of the angle of the green and the bunker protecting the middle left side. Favor a shot to the front left portion of the green for minimal risk of penalty. Firing at a blue pin on the back right brings into play the right bunker. Flying over the green leaves a very difficult pitch. Or missing the green long left leaving a very difficult pitch onto the green likely with trees in the way. All of these quickly bring double bogey into play.
| Yellow | 260 |
| Red | 344 |
| White | 354 |
| Blue | 364 |

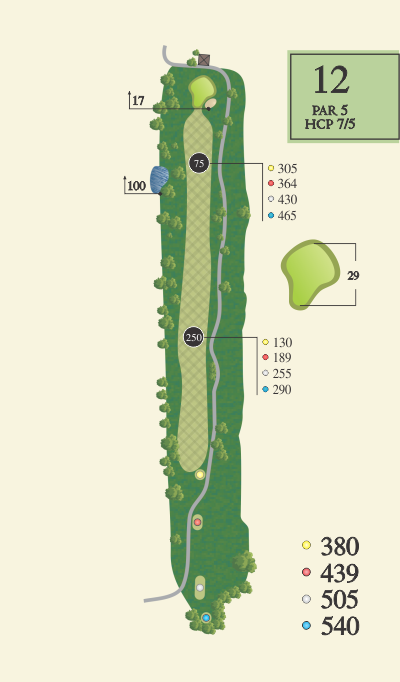
Description
This par 5 plays significantly longer than the stated yardage as it is uphill and often into the wind. Let your driver go here. Out of bounds on the left and right and the tall “Marge Simpson” arborvitae on the right create the biggest hazards in the landing area. Big hitters may be able to reach this green in two. Most will lay up to a comfortable approach shot yardage. A bunker on the right protects the right side of the green. This hole provides a good chance for birdie or par.
| Yellow | 380 |
| Red | 439 |
| White | 505 |
| Blue | 540 |

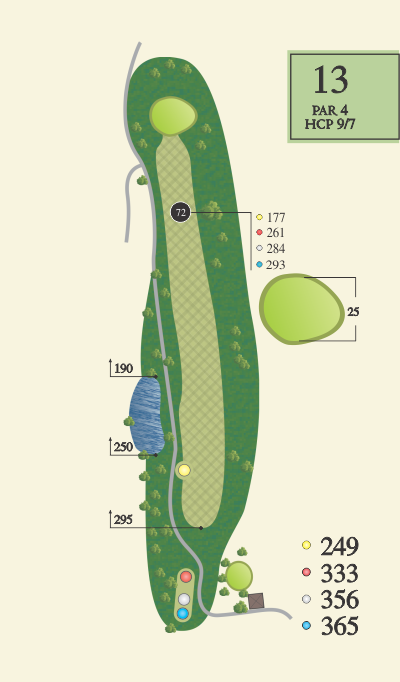
Description
Another reasonable birdie or par chance on this pretty straight forward par 4. Favor the right side of the fairway. There is out of bounds on the right at the top of the large slope. Avoid the trees on the left and right. A good tee shot leaves a mid to short iron into a large green. The green slopes back to front. Take advantage!
| Yellow | 249 |
| Red | 333 |
| White | 356 |
| Blue | 365 |

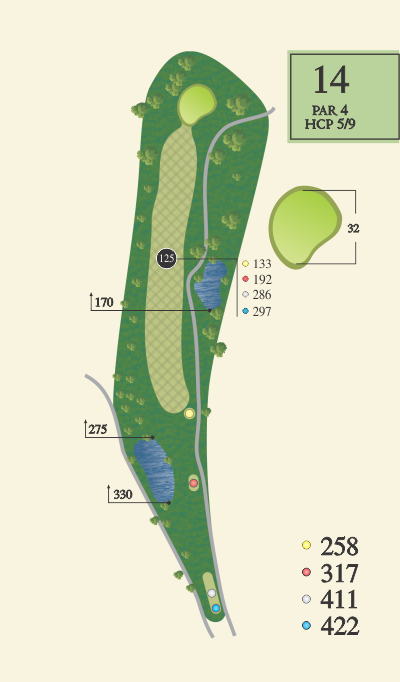
Description
This is a lengthy par 4 that features a slight dog leg right. Favor the middle left of the fairway off the tee to avoid the pond on the right side. This pond is not visible from the tee, but is within reach for many players. A lengthy approach shot into a large, two-tiered green makes this a difficult hole to make par.
| Yellow | 258 |
| Red | 317 |
| White | 411 |
| Blue | 422 |


Description
The large two-tiered green on this hole makes club selection key on this par 3. The green is well protected by bunkers on the left and right fronts of the green. A steep runoff on the front of the green makes bouncing a shot up to the green very difficult. A shot to a back pin risks running off the slope at the back of the green which creates an extremely difficult up and down. An accurate tee shot is critical for making a birdie or par.
| Yellow | 112 |
| Red | 135 |
| White | 145 |
| Blue | 155 |
Description
This is what some call a “sucker hole”. A short but challenging, dog leg right par 4. The green is reachable by big hitters, but is well guarded by bunkers on the front right and left of the green. For those willing to take the risk the line is over the out of bounds area on the right. A large tree on the right end of the fairway can block those balls heading toward the green. Those choosing to “play smart” and layout up the tee shot must choose their club carefully as it is easy to hit out of bounds on either the left or right. There is one tree on the left rough that is definitely in the landing zone. There is a fairway bunker on the right side of the fairway that will swallow up a longer but errant tee shot. A shot to the trees on the right will almost always require a chip out. The narrow but wide three-tiered green can be difficult to putt if you are on the wrong tier.
| Yellow | 205 |
| Red | 275 |
| White | 285 |
| Blue | 298 |
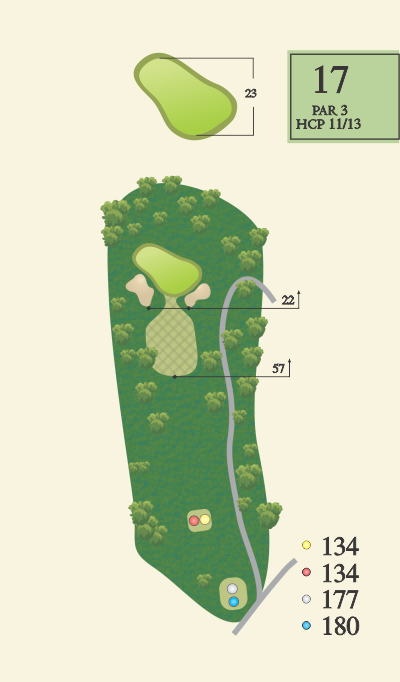
Description
There is a large false front that will allow shots into the green that are a bit short to roll all the way back off the green and onto the approach. Bunkers on the left and right of the green offer more protection. The green offers a fair bit of slope which makes sidehill and downhill putts even more challenging.
| Yellow | 134 |
| Red | 134 |
| White | 177 |
| Blue | 180 |

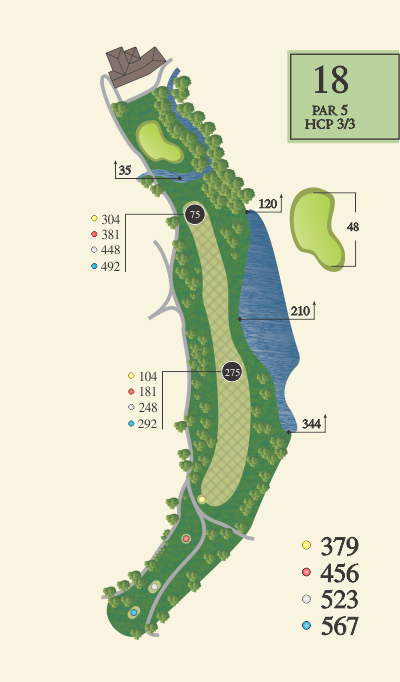
Description
Our signature hole. A double dogleg left full of trouble to end your day. This hole requires a well struck tee shot that is both accurate and shaped correctly. Longer hitters can reach the lake skirting a significant portion of the right side of the fairway. A well placed second shot to the top of the hill or longer will allow a clear shot into the huge green complex. Claggett Creek crosses the fairway just short of the green offering a challenging approach shot. A par on this hole is a good score any day!
| Yellow | 379 |
| Red | 456 |
| White | 523 |
| Blue | 567 |